JCCAA Web WordPress Training Class 4/6/2024

由 Website Committee John Huang (黃志強) 發起, 4/6 星期六有10位來自不同校友會代表參加 Web WordPress 操作入門課程. 參與會員們帶著自己的筆記型電腦, 跟著 John Huang 精心設計的課程, 一個步驟接著一個步驟, 學習如何用 WordPress 在 JCCAA 網站發布活動訊息, 包括如何作文字編輯, 加入照片/影片及其他網站連結 (如YouTube) 等等. John 老師深入簡出詳細的說明, 加上有小幫手第二副會長 June Chou 從旁協助大家, 新手們在短短一個半小時就學會初步操作. 課程中 WordPress Server 有 Crash 凍結的現象, 校友會員們開玩笑說: 可能是因為新手菜鳥太多, 同時間在同一個平台操作, Web Server 應接不暇, 過度運轉, 轉不動了!約十分鐘後,Web Server 又自動恢復。

會長戴珮青課程結束後表示: “謝謝John 老師為大家上了一堂 WordPress 使用操作的課, 也謝謝所有來參加講習的會員朋友們, 很歡迎各校友會利用 JCCAA 的網站來發布宣傳校友會的活動”. 第一副會長辜千慈, 則為大家建立了群組, 希望會員們繼續切磋學習!

How to make a web post

Web Development Topics:

What Is WordPress?

  • WordPress is a free, open-source website creation platform.
  • There are an estimated 64 million websites currently using WordPress.
  • Over 400 million people visit WordPress websites every month.
  • 661 new WordPress sites go live each and every day.
  • There are over 50,000 plugins available to enhance your WordPress website.
  • WordPress is available in 57 different languages, making it a truly global platform.
Click to the top of page

JCCAA Website Policy Statement

We advise all website users to be prudent and diligent, and take the necessary precautions and measures to comply with the JCCAA bylaws while utilizing JCCAA website to share or post information and materials about our organization or member organizations.

We urge all website users to keep away from those topics, contents or materials that are sensitive, controversial or inappropriate in nature such as but not limited to politics, religions, races, etc., which may result in discord, disruption, animosity or hostility within our organization or among our members.

We reserve the right to remove those publications that are deemed unsuitable in accordance with the above policy and to terminate the publishing privileges of those users that do not adhere to our policy.

For each JCCAA alumni web developer, please email your draft post title to: web.committee@jccaa.org by Wednesday. Then JCCAA web committee will publish your draft post on the following Friday. If you have any question about JCCAA website development, please also email to web.committee@jccaa.org.

Click to the top of page

How to login WordPress?

After you login, you enter WordPress Dashboard.

This is the Dashboard of WordPress.

You can change your password via “👤Profile” ➜ “New Password” ➜ “Set New Password”.  {Note: DONOT change “Display name publicly as”}. Then click “Update Profile”.

Click to the top of page

How to add a new Post in draft

From WordPress ⏲ Dashboard ➜ 📌Posts ➜ All Posts, click “Add New” to start a new post. {Notice: WordPress adopts “Post” word to represent all web pages you create. Therefore, WordPress uses “Page” to represent another meaning.}

This is a brand new post.
Click to the top of page

Add Title and Select Your school Category

It is required to enter Title and School Category for each new post.

If your Title contains any Chinese characters (i.e.海洋大學), click “Preview” might get “Bad Request” page, as below: {Note: DONOT click “Publish”}

If your Title contains any Chinese characters (i.e.海洋大學), click “Preview” might get “Bad Request” page.

To solve the above problem, you need to change the “Permalink” to be ALL ENGLISH letters inside the “URL Slug” field.

You need to change from “海洋大學” to “Ocean-University”, then click “Save draft”. {Note: DONOT click “Publish”}

Then click “Preview in new tab”. 

Preview your post in draft
Click to the top of page

How to change you post status between "Published" and Draft"?

In case you click “Publish” accidentally,  you can change post status from “Published” to “Draft” by following the two steps below:

  1. From ⏲ Dashboard ➜ 📌Posts ➜ All Posts, move cursor to the published post Title. The “Quick Edit” option appears. 
  2. Click “Quick Edit”. Change “Status” from “Published” to “Draft”. Then click “Update”.
Click to the top of page

How to edit your new post with “Elementor” widgets?

Now it is ready to edit your new post with Elementor, which provides many user-friendly tools, called widgets, for your web post editing. Click “Edit with Elementor”.

Click to the top of page

How to write your text contents ?

Three steps to write text contents in your new post:

  1. Drag the “Text Editor” widget into here (the white box here)
  2. Enter your texts into “Text Editor”, It will show up in your post. 
  3. Then click “Save draft”.  {Note: DONOT click “Publish”}
Click to the top of page

How to add a photo image?

Six steps to add image (width: 1024 pixel) into your post

  1. Drag the “Image” widget into here (the white box here)
  2. Move mouse to “Choose Image”. Then click “Choose Image”.
  3. From “Upload Files“ tab, “Select Files” of your photo from your PC.
  4. Option: You may add link (Custom URL) to this photo image by clicking “Link ➜ Custom URL”. 
  5. Option: After entering your desired URL, you may set to “Open in new window” by clicking Link Option symbol “✵”.
  6. Then click “Save draft”.  {Note: DONOT click “Publish”}
Click to the top of page

How to use "button" to open a PDF file in a new window?

  1. Upload your PDF file into JCCAA WordPress:
  2. From Dashboard ➜ Media ➜ Add New, select PDF file from your PC.
  3. After uploading, copy PDF’s URL to clipboard. (i.e. https://www.jccaa.org/wp-content/uploads/2022/03/JCCAA-Web-dev-class-names.pdf)
  4. Goto the Elementor, drag the “Button” widget into here (the white box here).
  5. Enter Text “Click here to view the PDF file” in the Button.
  6. Enter Link (of PDF’s URL) “https://www.jccaa.org/wp-content/uploads/2022/03/JCCAA-Web-dev-class-names.pd”.
  7. Select Link Option “Open in new window” via clicking symbol “✵”.
  8. Select Alignment to be “Center”.
  9. Select Size to be “Large”.
  10. Finally click “Save draft”.  {Note: DONOT click “Publish”}
Click here to the top of page
Click to top of page

How to embed a PDF file document?

Use plugin “PDF-Embedder” by “Text Editor” widget with the text contents: [ pdf-embedder url = “https://drive.google.com/…” ]

Follow the following steps to embed a PDF file document into your post:

  1. Get PDF’s URL from either Google Drive or uploading your PDF file into JCCAA WordPress.

1.1.  Option: Upload your PDF file into JCCAA WordPress

1.2. From Dashboard ➜ Media ➜ Add New, select PDF file from your PC.

1.3. After uploading, copy URL to clipboard. (i.e. https://www.jccaa.org/wp-content/uploads/2022/03/JCCAA-Web-dev-class-names.pdf)

  1. Drag the “Text Editor” widget into here (the white box here)
  2. Enter the following text into “Text Editor” field:

pdf-embedder url=”https://www.jccaa.org/wp-content/uploads/2022/03/JCCAA-Web-dev-class-names.pdf” ]

  1. Then click “Save draft”.  {Note: DONOT click “Publish”}

* How to preview your post in draft?

From Dashboard ➜ Posts ➜ All Posts, Move cursor to your post name (draft), then click “Preview”.

Preview and click to try it in a new window.
Click to the top of page
  1. Drag the “Button” widget into here (the white box here).
  2. Enter Text “Click here to open the Zoom meeting” in the Button.
  3. Enter Link “https://us02web.zoom.us/j/85417089124?pwd=dU45dU53RnJPUlhBbm4reVNINzl2QT09”. 
  4. Select Link Option “Open in new window” via clicking symbol “✵”.
  5. Select Alignment to be “Center”.
  6. Select Size to be “Large”.
  7. Select Icon library via clicking symbol “●”.
  8. Select user circle icon “☻”. Then click “Insert”.
  9. Change Button background color.
  10. Change Button’s Motion Effects.
  11. Finally click “Save draft”.  {Note: DONOT click “Publish”}
This is icon library, containing many icons for you to choose.

Change Button background color by tabbing “Style ⚈”. Then select Color Picker via clicking Color symbol “🟩”.

You can choose any kind of colors in Color Picker popup window.

Change Button’s Motion Effects by tabbing “Advanced ⚙︎”. Then select “Motion Effects” ➜ “Entrance Animation” ➜ “Bouncing” ➜ “Bounce in Left”. Finally click “Save draft”.  {Note: DONOT click “Publish”}

How to use “Button” widget to send an email (open to compose email in a new window)?

  1. Drag the “Button” widget into here (the white box here).
  2. Enter Text “Click here to send an email” in the Button Text.
  3. Enter Link “mailto: SomeoneName@gmail.com”. 
  4. Select Link Option “Open in new window” via clicking symbol “✵”.
  5. Select Alignment to be “Center”.
  6. Select Size to be “Large”.
  7. Select Icon library via clicking symbol “●”. Then select Envelope icon “✉️”. 
  8. Finally click “Save draft”.  {Note: DONOT click “Publish”}
Preview and click to try it in a new window.
Click to the top of page

How to post a Google Drive photo album?

Prerequisite: You already have Google Drive photos album as:

https://photos.app.goo.gl/YcXcJEgYEvt99NHA8 

  1. Make a screenshot image of Google photo album. The image width is 1024 pixel.
  2. Use the “Image” widget to choose this image from your PC. 
  3. Enter image Custom URL field as a prerequisite Google Drive album’s URL: https://photos.app.goo.gl/YcXcJEgYEvt99NHA8
  4. Set Link option as “Open in new window”.
  5. Finally click “Save draft”.  {Note: DONOT click “Publish”}
Screenshot image of Google photo album

Use the “Image” widget to choose the above image from your PC.

Preview and click to try it in a new window.
Click to the top of page

Prerequisite: You already have YouTub video URL as:

https://youtu.be/8fhl8fdlsLA

  1. Drag the “Video” widget into here (the white box here)
  2. Select Source: “YouTube”. Enter Link: https://youtu.be/8fhl8fdlsLA
  3. Finally click “Save draft”.  {Note: DONOT click “Publish”}
Preview and click to try it in a new window.
Click to the top of page

How to embed a Google Map?

  1. Drag the “Google Maps” widget into here (the white box here)
  2. In the Location field, enter your address or attraction name (i.e. Houston Museum of Natural Science).
  3. Finally click “Save draft”.  {Note: DONOT click “Publish”}
Preview and click to try it in a new window.
Click to the top of page

The internal anchor link is linked within the same web page. When you click on an internal anchor link in the “FROM” section (widget), you will scroll automatically to the referred  “TO” section (widget) and display it on the same web page. The internal link name is followed by the hash sign(#), called CSS ID. You have to assign this CSS ID to refer section of the same web page.  The following steps show how to assign CSS ID and to link to #CSS ID, using “Web-Topics” as example: 

  1. Assign the CSS ID in the “TO” section (widget). Tab the widget “✫Advanced” ➜ “CSS ID”, enter CSS ID name: “Web-Topics”.
  2. Link the #CSS ID in the “FROM” section (widget). Tab the widget “✎Content” ➜ “Link”, enter #CSS ID name: “#Web-Topics”.
Click to the top of page

Do not change your “Nickname” and “Display name publicly as” in “Profile”. And do not enter any text in "Tags" field from "Quick Edit".

In order to recognize easily who publishes the web post, please do not change your “Nickname” and  “Display name publicly as” in “Profile”.

Do not enter any text in “Tags” field from “Quick Edit”. This “Tags” field is reserved to be used by JCCAA web administrator.

Click to the top of page

Useful References

WordPress reference:

The complete recording of the Alumni Website Development Training class is uploaded into YouTube, as below:

https://www.youtube.com/watch?v=J8GhkP1AJSU

Click to the top of page

What is Roles and Capabilities in WordPress

WordPress uses a concept of Roles, designed to give the site owner the ability to control what users can and cannot do within the site. A site owner can manage the user access to such tasks as writing and editing postscreating Pagescreating categoriesmoderating commentsmanaging pluginsmanaging themes, and managing other users, by assigning a specific role to each of the users.

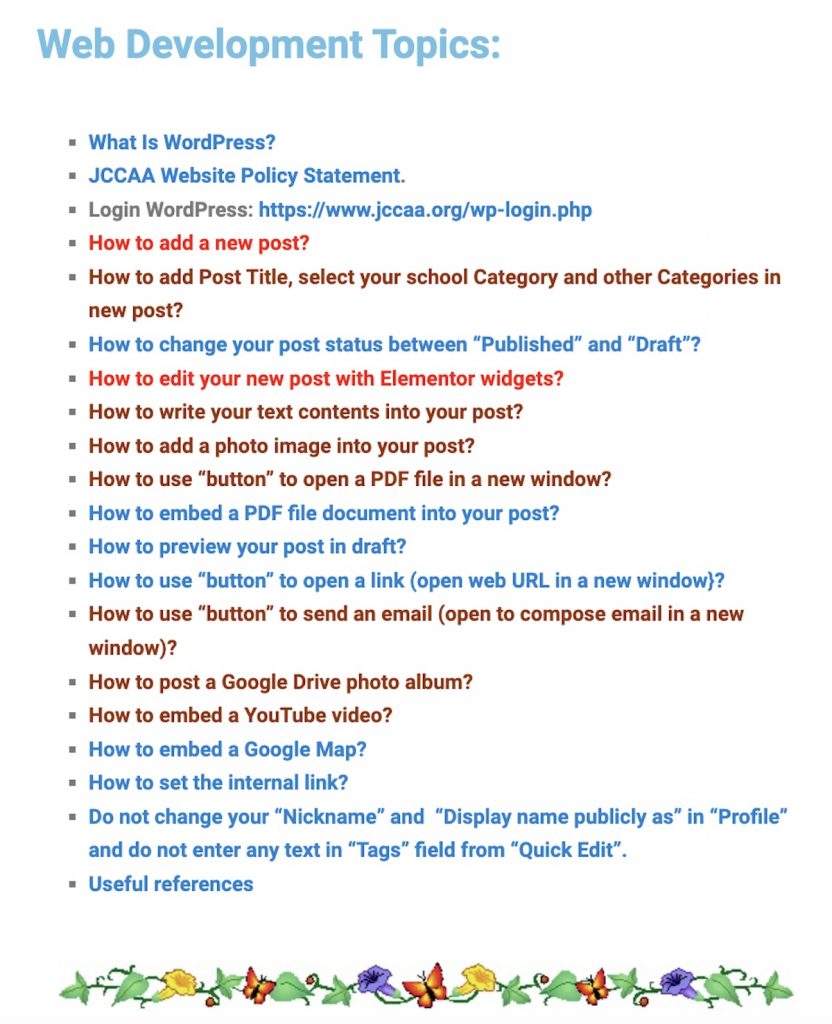
WordPress has six pre-defined roles: Super AdminAdministratorEditorAuthorContributor and Subscriber. Each role is allowed to perform a set of tasks called Capabilities. There are many capabilities including “publish_posts“, “moderate_comments“, and “edit_users“. A default set of capabilities is pre-assigned to each role, but other capabilities can be assigned or removed using the add_cap() andremove_cap() functions. New roles can be introduced or removed using the add_role() and remove_role() functions.

The Super Admin role allows a user to perform all possible capabilities. Each of the other roles has a decreasing number of allowed capabilities. For instance, the Subscriber role has just the “read” capability. One particular role should not be considered to be senior to another role. Rather, consider that roles define the user’s responsibilities within the site.

Summary of Roles #Summary of Roles

·         Super Admin – somebody with access to the site network administration features and all other features. See the Create a Network article.

·         Administrator (slug: ‘administrator’) – somebody who has access to all the administration features within a single site.

·         Editor (slug: ‘editor’) – somebody who can publish and manage posts including the posts of other users.

·         Author  (slug: ‘author’)  – somebody who can publish and manage their own posts.

·         Contributor (slug: ‘contributor’) – somebody who can write and manage their own posts but cannot publish them.

·         Subscriber (slug: ‘subscriber’) – somebody who can only manage their profile.

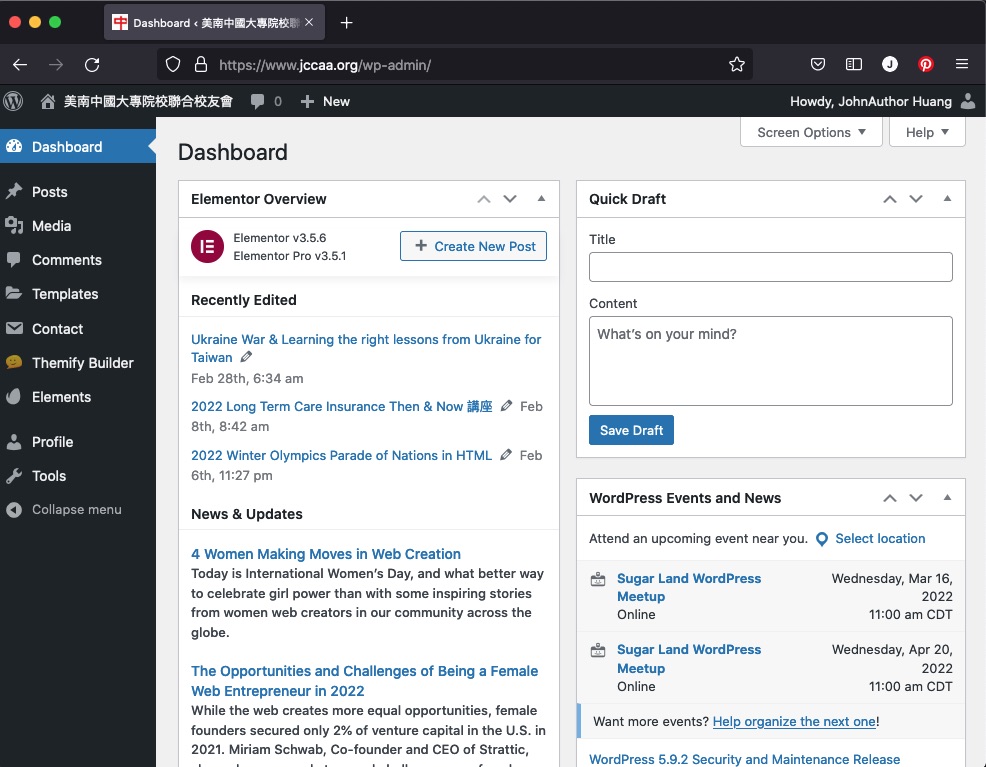
Upon installing WordPress, an Administrator account is automatically created.

The default role for new users can be set in Administration Screens > Settings > General.

Roles and Capabilities | WordPress.org

How to adjust the JCCAA homepage appearance

Advanced Topics:

  • How to add a new Category?
  • How to make Menu setting?
  • How to add JCCAA Logo?
  • How to change JCCAA background image?
  • How to customize Widgets on right-side Sidebar?

How to Add a New Category to WordPress

In your WordPress dashboard click on posts. You will see the Categories option click on it.

As you can see there are already a few categories created. Let’s add a new category called “slider”. Then click “Add New Category” button.

How to make menu setting

The Menu on the top enables us to create a custom menu (also known as a navigation bar, navigation menu, or main menu). It is a section of the site that helps visitors to navigate the site.

In our menu, we can add different items such as links to pages, articles, categories, or custom links to the URL of my choice, such as another site, and then choose the order of the items and their hierarchy (possibility of creating submenus). In short, our menu is fully customizable.

The Appearance Menu Screen is accessible from the Dashboard via Appearance > Menus.

Two steps to add a new menu (For example: Add “Feng Chia (逢甲大學)” submenu):

  1. Click Appearance ➡︎ Menus ➡︎ Customer Links, enter URL & Link Text, then click “Add to Menu”
  2. In Menu structure, drag the new menu “Feng Chia (逢甲大學)” to become “JCCAA Alumni” submenu. Then click “Save Menu”.

Contact Form Testing by using Contact-Form-7 plugin

Simple form test

    Travel Registration Form for testing

      Taiwan Travel Guide

      2021 🇹🇼 台灣地圖與交通 : 美麗台灣心視界

      美麗的「台灣」,有福爾摩沙、美麗之島和寶島等等別稱;台灣本島外觀像似蕃薯形狀,這塊土地蘊藏的自然資源和人文樣貌十分豐富,除了風景秀麗,也有優良的傳統文化、地方特色以及美味可口的餐飲料理,可說全台都有美食餐廳和在地風味小吃。台灣民眾普遍熱情好客,對待外地遊客與來自國外的朋友十分友善,歡迎您來觀光遊玩並體驗中華民國寶島台灣的風土民情,無論自由行或是團體旅行,在台灣旅宿都相當方便,北中南也有:火車、高鐵、捷運及客運可搭乘遊覽各景點,也可租借自行車,享受鐵馬暢遊城鄉的樂趣!由於台灣四面環海,航空海運四通八達,亦是往來亞洲各地的重要樞紐,因此,風景優美的台灣,也是各國觀光客喜愛前來旅遊休閒和探訪的美麗勝地。

      ☃每一張照片,點進去,就是該景點的介紹。